
With hemp legal in all 50 states*, and those with a little outdoor space searching for something to do now that it’s warming up, this Summer should see a boom in casual home grows. After a few years of giving starter plants and cultivation tips to friends and neighbors, and at the request of those same kind folks, I’ve written out the basics to be able to Grow Yer Own at Home. This is by no means a definitive guide, just some easy steps and hand-holding for the beginner.
Sun, water, soil, and darkness. These are the four pillars you need to dial in for a good harvest. You have to give your plant at least 6 hours of direct sunlight per day to achieve something decent. Watering should be done on a schedule and adjusted accordingly once you’ve figured out your plant’s needs. The dirt that you’re putting the water into should be nutrient-rich and well-draining so that the roots can thrive. And it needs to be black at night—meaning no lights whatsoever. Plants, like humans, need to sleep. Beyond all of this, just remember that the plant wants to grow and will grow. They don’t call it weed for nothing.
EQUIPMENT:
SEEDS: Find a strain you like, with the characteristics you want. Shoot for as high a CBD percentage as you can. We’re growing AC/DC this year, after enjoying what our farmers did with it in previous seasons. You can find a multitude of hemp seed providers on the internet.
SOIL: For your first time, most out-of-the-bag options will do. What you’re going to want to look for is something organic, nothing with chicken shit. Fox Farms Ocean Forest is fairly dependable, and Roots Organic has a nice bag of soil as well. I like to use a mixture of Ocean Forest, Roots Organic, and Alaskan Humus. The ancient dirt is great for very hot dry environments, as it helps with water retention and its got old earth nutrients.
CONTAINER: Unless you’re planting straight into the earth, you’ll need to grow in something. A raised bed is a nice option, but you have to make sure that it’s not too big, as the surface area means the dirt in the container gets hot and dry in the sun and the overall soil moisture will be more uneven. Your best bet is a fabric pot, Smart Pot makes a good one, but almost any will do. Depending on how much you want to grow and what your space can handle, somewhere in the 7 to 15-gallon range should be plenty. You’ll also need a couple of smaller pots for the transformation. One container the size of what you buy your vegetable plants in, and another that is 1.5 gallons.
LOCATION: You need sun, lots of it. To grow a nice healthy plant, at least 6 hours of direct sunlight. a little shade is not too bad for a couple of hours in the midday, but the more sun the merrier. What is just as important is the darkness. The plant needs to sleep at night, uninterrupted, so you’ll want to choose a spot that doesn’t have any neighborly light beams shining in on it. Also, no close windows that would cast light in the night. This really doesn’t matter too much until the flowering stage, but then darkness is crucial. If there is light at night, the buds won’t get really nice and fat and that’s kind of depressing if you’ve been tending to this thing for 4+ months.

You’ve got your seeds, your soil, your pot, and your spot. Now is the time for action. Take a few of the seeds and place them in a slightly damp paper towel. Fold this paper towel up and place it in a small watertight container like a film canister. Place this in a drawer or dark place that is warm, usually somewhere near an appliance is good. Leave this alone for a day or two, and then check in to see if the seeds have sprouted. You’ll know this has happened when you see a white tail come out of the seed. If they haven’t sprouted, don’t be dismayed. Just check again the following day. Some seeds are older and take time to coax from the shell.
NOTE: Don’t get all giddy and try to germinate all of the seeds you have. You’ll end up with a forest and no seeds to plant next season.
Once sprouted, fill the smallest container with soil and place the seed sprout down about ¾ to 1-inch, and cover back up with soil. Give the container a nice gentle soak and place it in a warm spot with a little sun. With some luck, a little seedling should pop-up within one to two days, with some taking a couple more.
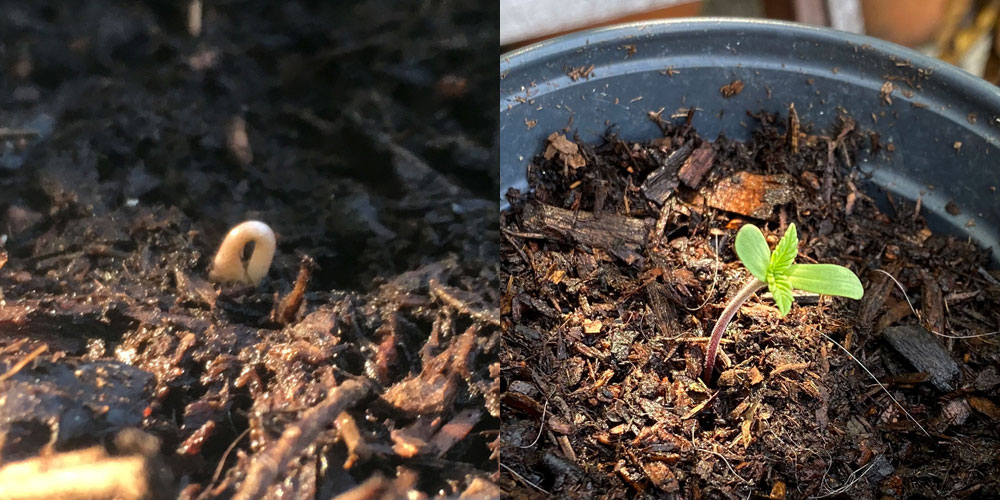
When the little plant opens up and spreads its first two tiny leaves you’re in business. Keep the soil moist but do not overwater. Over the next couple of days, keep incrementally giving the plant more sunlight until you have it in the sunniest spot possible. From here you let the plant get to work. Get a feel for how it likes to be watered, every other day usually is pretty good depending on the amount of sun and heat. When you feel like it’s ready to graduate out of the nursery, get a 1-gallon pot ready with soil, let the plant dry out a little, then do the transfer. You can keep the plant in here for at least 3 weeks. It is during this period of vegetative growth, that you have the option to top the plant. Topping is essentially cutting the plant back to divide the main trunk into two. This doubles the number of tops aka flowers when the plant matures. You want to top after the 5th node develops, but if you miss the window, no stress, it’ll grow just fine naturally.
If the plant is healthy and prosperous, it will be ready to transplant around the 6th or 7th node. When you’ve decided on how big you want to go, fill your pot with the soil mixture you’ve chosen and get the plant into its final home. From here you follow the watering regimen that your plant desires. Depending on the soil elements and size of the container and plant, you might want to give it some organic nutrients along the way during the vegetation cycle. It’s pretty safe to just use Fox Farm Big Bloom. You can obviously do some research and make your own compost tea or whatever. Just pay attention to how it reacts and don’t overwater. Talk to the plants, play some music to them. Whatever your vibe. Let them grow.
Sometime, usually in mid-July, the plants will go into pre-flower and show their sex. This is the time where you want to get rid of the male plants. You can identify the sex by looking at the spot where the branch and the stem meet. If it’s a female, you will see a pair of white hairs, or maybe a single one, poking out of the corner. Males, on the other hand, have a spade-like appendage, and early on it will look like a little ball.
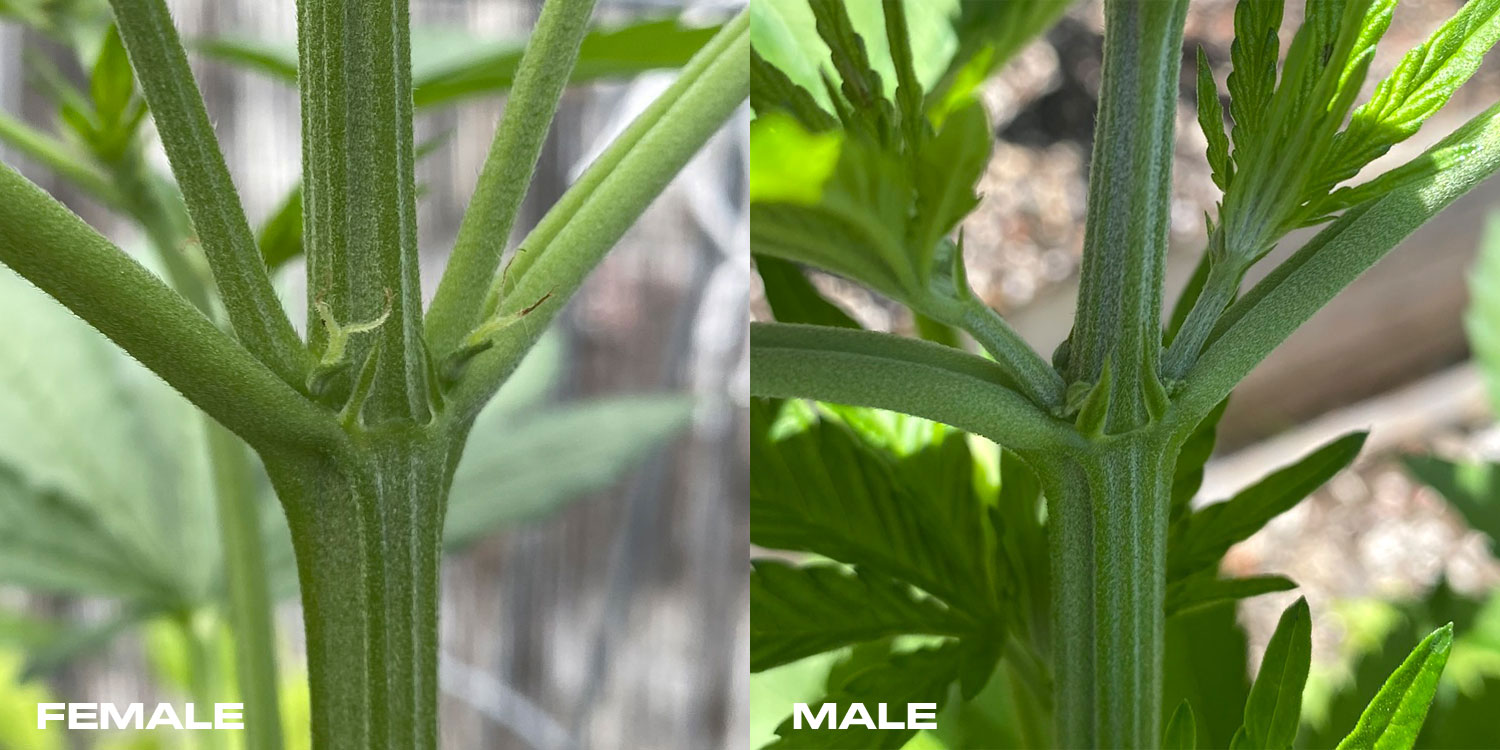
Pull the males when you see them. Make juice out of the leaves and throw the rest out. Unless you want a plant full of seeds to make sprouts from, seedless is the way to go, as the plant will focus its energy on the flower and not the spawn.
It’s at this time that you want to look at the plant’s surroundings at night. It is crucial that there is no ambient light, direct light, any light at all around it. The lighter it is, the less mass that you’ll have in your buds, and the higher the possibility of weird things happening like it going hermy.

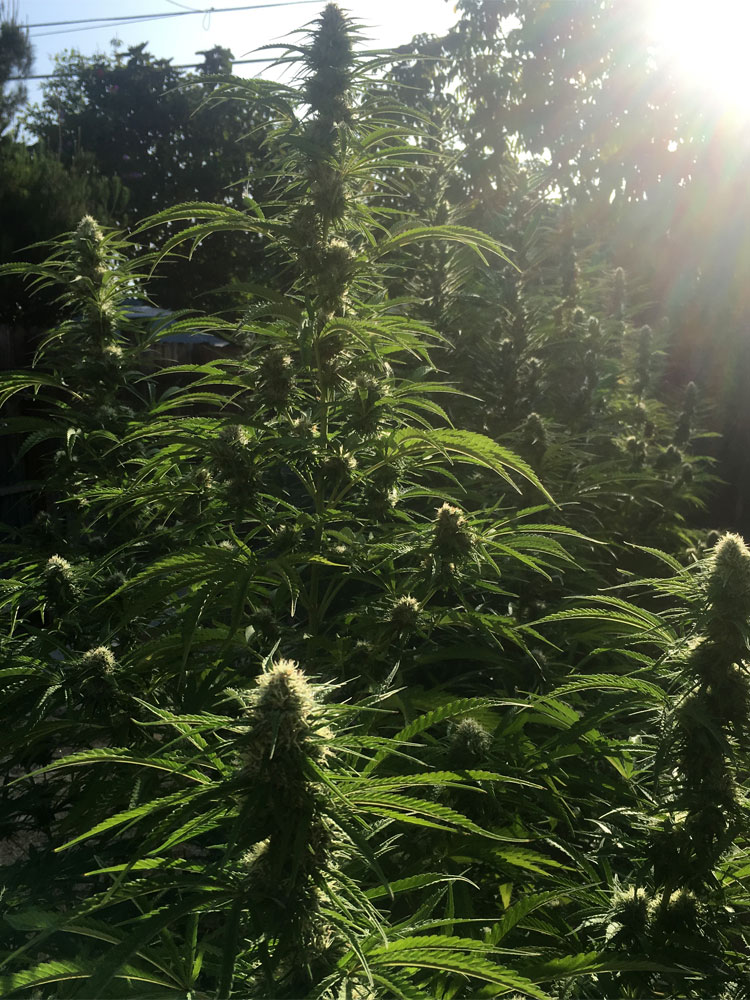
At the beginning of the flowering stage, your plant will stretch. Maybe you were happy with its size, maybe you weren’t. Just wait, it is about to get a lot bigger. As flowers start developing, this will be your last chance to pull any males that you might have missed. By this point, the males will have developed balls. Clip them. When you’re confident the plant is flowering, you can opt for bloom formula nutrients to help develop the flowers. Some people will add molasses to their watering cycle to get the plants some extra sugar. If you opt for nutrients, feed the plants a more diluted mix than what the label calls for until its acclimated. Better not to burn the plants. During flowering, keep a lookout for worms/caterpillars. I’ve usually found them in late-August followed by a second round in September. They eat your buds and shit in them, which in turn rots them out. Get rid of them as soon as you see them.
If you’ve done a decent job, the flowers should be ready to harvest somewhere between late September and late October. You’ll want to get a jewelry magnifying glass with a light attached. Amazon sells them for like $10. You’ll know when everything is ready when a majority of the heads of the trichomes have turned milky. If too many are clear or amber, the cannabinoid content will not be at its peak.
Once you’ve decided to chop your plants down, make sure to give your buds a nice rinse and shake out a day or so prior to harvest. Then chop the plant in the morning when the plant is still waking up. This is also the point when you’ll probably realize that you don’t have enough room for everything that you’ve grown.

Now comes the most crucial stage of the process. DRYING. You could have grown the best buds in the world, but screw up the drying and they’ll be a disappointment. Ideally, you have a spare bathroom or closet that you can close out for the next 2-3 weeks. If not, get creative. You want somewhere that does not have a breeze or fans blowing on it, is low humidity and has a temperature in the high 60s / low 70s. You want to do a real slow dry so that all the good stuff is preserved. You’ll know when everything is ready when you’re able to snap the stems. From here you trim down the flower and pop it into big airtight containers. You’ll want to get some Boveda packets (or any humidity control pack) to get your buds even nicer in this last curing stage. While it’s super tempting to go all in and sample your new flower, you should still let it cure to get the best bud. All you’ve got to do is keep the jar in a dark cool place and open it up a couple of times a day to burp some old air out. If you’ve made it this far, good job. We look forward to you getting even better next season.
*Obviously, before beginning any of this, it is best to contact city, county and local zoning agencies and officials regarding any regulations, codes, and conveyances with which you may need to comply. Hemp is classified as any cannabis containing less than 0.3% THC, so be sure to remember that.